Kindle Instructions
Online Kindle Support (Click on Kindle Keyboard)
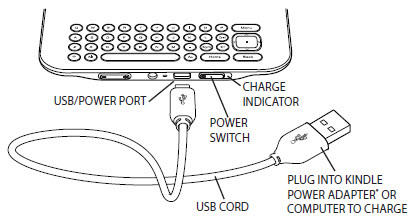
To turn on the Kindle, slide and release the power switch. Turning off the Kindle is done the same way.
To save battery, turn Wi-Fi off while reading, and only turn Wi-Fi on to sync Kindle and download books. To turn Wi-Fi on or off, press the ‘Menu’ button and select either ‘Turn Wireless On’ or ‘Turn Wireless Off.’
Getting Around
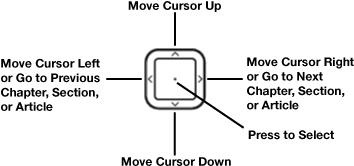
You navigate Kindle using the 5-way controller; the Home, Menu, Back, and Next/Previous Page buttons; and the keyboard:
To select a particular item such as a menu option or a specific word in your reading material, press the up, down, left, or right button on the 5-way controller to highlight your choice and then press the center of the 5-way controller to confirm your choice.
You can press the Next Page or Previous Page button to move forward or backward in your reading material and press the Back button to retrace your steps on your Kindle. Use the keyboard to type words or phrases when searching your reading material or items in the Kindle Store. You can also use the keyboard to create notes while reading. All of these are covered in more detail later in this guide.
Easy-to-Read Display
Kindle uses a high-resolution display technology called electronic paper. It works using ink just like books and newspapers, but it displays the ink particles electronically. The page flash you see when you turn the page is part of the ink placement process.
The electronic paper display is reflective, which means, unlike most displays, you can read it clearly even in bright sunlight. Also, electronic paper does not need power to hold the ink in place, which extends your Kindle’s battery life.
Your Choice of Text Size, Typeface, and Line Spacing
To optimize your reading experience, Kindle provides a quick way to adjust the text size, typeface, and line spacing in books and periodicals.
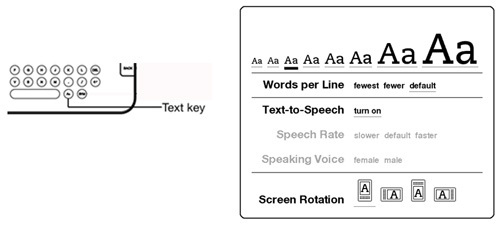
In a book or periodical you are currently reading, you can change the text size, typeface, and line spacing by pressing the Text key, and using the 5-way controller to choose the size you prefer; then press the 5-way to select. The text changes to the new settings. Repeat the same steps to adjust the text to the settings that are most comfortable for you to read.
Your Choice of Number of Words per Line
You can also change the number of words per line in the book or periodical you are currently reading. Press the Text key, use the 5-way controller to choose the number of words per line you prefer, and press the 5-way to select. This changes the width of the margins. You may find you read faster with fewer words per line. Experiment to see what works best for you.
Adjust Screen Rotation
The Kindle screen image can be rotated so you can see the entire width of a page. The buttons work the same in either rotation, but the 5-way controller movements are switched to match the rotation.
To lock your screen into portrait or landscape mode, follow these steps:
- Press the Text key located on the bottom row of the keyboard. Screen Rotation is displayed at the bottom of the menu.
- Move the 5-way to select one of the four options to lock the display in a set orientation: portrait, landscape with the keyboard on the left, portrait with the keyboard at the top, and landscape with the keyboard on the right.
- Press the 5-way to confirm your choice.
Read PDF Files
Kindle can display a PDF document without losing the formatting of the original file. Just drag PDF files over USB to your Kindle or e-mail them to your dedicated Kindle e-mail address (found on the Settings page on Kindle or the Manage Your Kindle page on Amazon). If you e-mail a PDF document to your Kindle’s e-mail address, we will wirelessly deliver the PDF file directly to your Kindle via Whispernet.
Let Kindle Read to You or Guide You
You can turn on the experimental application, Text-to-Speech, which will read aloud your books (where allowed by the rights holder), newspapers, blogs, and personal documents. While reading a book or periodical, press the Text key, then use the 5-way controller to underline “turn on” for “Text-to-Speech.” Press the 5-way to select “turn on.” You can either listen through your Kindle’s external speakers or plug earphones into the headphone jack. While Text-to-Speech is playing, the screen will turn the pages automatically so you can follow along while the audio is playing. You have the choice of hearing your content spoken with a male or female voice and can also further optimize the listening experience by slowing down or increasing the rate of speech.
While Text-to-Speech is playing, the screen will update to the corresponding page of text.
For PDF files and books which the rights holder does not allow Text-to-Speech to read aloud their content, then “Text-to-Speech” will be dimmed and you will not be able to select it.
By default, Text-to-Speech starts reading at the beginning of the page currently displayed. To start reading at a particular spot, move the cursor where you’d like the reading to begin before starting Text-to-Speech.
Tip: You can also play or stop Text-to-Speech by holding down the Shift key and pressing the Symbol key . You can pause and resume Text-to-Speech by pressing the Space bar. Text-to- Speech continues playing even if you put your Kindle to sleep by sliding and releasing the power button. Sleeping your Kindle while Text-to-Speech is playing allows you to continue listening but locks all of the keys and buttons so you don’t inadvertently press one.
Voice Guide complements Text-to-Speech by allowing you to navigate Kindle with spoken menus, selectable items, and descriptions. Using Voice Guide, you can navigate your Kindle while Kindle speaks actions, descriptions, or status messages. For example, when you open a book, Kindle tells you your current location and how far you’ve read.
Look It Up
Your Kindle includes two dictionaries: The New Oxford American Dictionary (the default) and the Oxford Dictionary of English. You can easily look up a particular word without leaving the content. Simply use the 5-way controller to navigate the cursor in front of the word you want defined. A definition of the word appears at the bottom or top of the screen. To view the full definition, press the Return key on the keyboard. To return to the text you were reading, press the Back button.
Search Your World
While you are in Home, the Kindle Store, or reading content, you can use your Kindle’s search feature. From the keyboard, begin typing what you’d like to search for and then using the 5-way controller, select the range of your search. If you begin your search while in Home or with open content, you have the option to search for that item in all of your books, newspapers, blogs, personal documents, and annotations. You also have the option to focus your search to the built-in dictionary, the Kindle Store, Wikipedia, Google, and the web.
Clip Your Favorite Passages
While reading a book, newspaper, or personal document, have you ever wanted to clip and save a few words to refer to later? With Kindle, simply select “Add a Note or Highlight” from the menu and use the 5-way to highlight the content you want to clip and then press the 5-way to save your selection. The clipping is added to a file in Home called “My Clippings.” You can review your clippings later, search for words or terms you clipped, and transfer the “My Clippings” file to your computer. This is a great way to capture your favorite quotations to share with others.
Bookmark Your Reading
Kindle automatically saves your place in whatever book you are reading, but you can also add a bookmark to any page in a book or PDF document by pressing the Menu button and selecting “Add a Bookmark.”You can see that the upper right corner of the page is dog-eared. Kindle stores all your bookmarks for the current content in your annotations. You can view them at any time by pressing the Menu button from the book you’re reading and selecting “View Notes & Marks.”
Add Your Own Notes
Do you like to take notes and make comments while reading? You can add notes to any of the content on Kindle. Amazon automatically stores all of your book annotations in the “My Clippings” file and backs them up at Amazon so they will not be lost.
To add your own note, move the cursor to the word where you want to add your thoughts, and begin typing your note. Then use the 5-way again to highlight the “save note” button onscreen and press the 5-way to select. You can later view, edit, or remove a note, or see all of your annotations by pressing the Menu button and selecting “View Notes & Marks.” Notes appear as underlined text, with a superscripted number at the end. To see the note, use the 5-way controller to move the cursor over the notation number.
Entering Text
To use the Kindle keyboard, most people find it easiest to hold the device in both hands, and use the tips of their thumbs to press the keys.
Lowercase and Uppercase Letters
To enter lowercase letters, press the appropriate letter key. To enter uppercase letters, hold down the Shift key, and then press the desired letter key like you do on your computer keyboard. Alternatively, you can press and release the Shift key and then press the desired letter. Only the next letter will be capitalized. The Shift key is located at the bottom left corner of the keyboard.
Numbers, Punctuation, and Symbols
While typing, to enter a punctuation mark, symbol, or number, press the Symbol key located in the second row from the bottom of the keyboard. Use the 5-way controller to choose the character you want and it will appear in your text entry box. You can continue typing on the keyboard while the Symbol menu is displayed. Press the Symbol key again to dismiss the Symbol menu.
Wi-Fi Connectivity
While you’re reading, and for many other activities, your Kindle does not need to connect to Whispernet. A Whispernet connection is required to shop in the Kindle Store.
Using Wi-Fi
Kindle automatically detects nearby Wi-Fi networks and hotspots that broadcast their network name. When you visit a place that offers Wi-Fi access, such as your school, home, or the Wi-Fi hotspot at your favorite café, you can set up a Wi-Fi network. Once you set up a Wi-Fi network and connect to it, Kindle automatically connects to it the next time you return to the same place, as long as the Wi-Fi signal is strong enough.
Connect to a Wi-Fi Network
Your Kindle can connect to Wi-Fi networks or hotspots that use the 802.11b or 802.11g standard. Kindle does not connect to enterprise or ad-hoc Wi-Fi networks (networks that allow peer-to-peer connections without a wireless access point). Keep in mind that you must be within range of one or more Wi-Fi networks in order to connect to one.
To connect to a Wi-Fi network, follow these steps:
- Press the Home button, then press the Menu button.
- Navigate to “Settings” by moving the 5-way controller down, then press the 5-way controller to select.
- Select “view” next to “Wi-Fi Settings” to display a list of detected Wi-Fi networks. You may have to wait a moment as your Kindle detects networks in range. Kindle automatically scans for available Wi-Fi networks at periodic intervals. To rescan for available networks at any time, select “rescan.”
- Select “connect” to connect to a network. If you see a lock symbol next to “connect”, the network requires a password to connect.
- Enter the Wi-Fi password (if required). Press the Symbol key to enter numbers or characters not present on the Kindle keyboard. You can continue to use the keyboard while the Symbol menu is displayed.
- Choose “submit.” Kindle connects to the Wi-Fi network.
Once you’re connected to a Wi-Fi network, Kindle automatically connects to it again whenever that network is in range. If more than one previously used network is in range, your Kindle automatically connects to the network that was most recently used.
Once your Kindle connects to a Wi-Fi network, that network displays “forget” next to it in the list of available networks. Selecting “forget” disconnects your Kindle from that Wi-Fi network and also prevents Kindle from automatically connecting to it in the future. For more information, see “Forget a Wi-Fi Network.”
Add a New Wi-Fi Network
If you don’t see the network you want to connect to in the list of detected networks, you can add it by choosing “enter other Wi-Fi network” at the bottom of the list of detected networks.
To add a new Wi-Fi network, follow these steps:
- Make sure you are within range of the network you want to add, and that you know the network name and password (if required).
- Press the Home button, then press the Menu button.
- Navigate to “Settings” by moving the 5-way controller down, then press the 5-way controller to select.
- Select “view” next to “Wi-Fi Settings” to display a list of detected Wi-Fi networks.
- Use the 5-way controller to navigate down to “enter other Wi-Fi network” and press to select.
- Enter the name of the Wi-Fi network that you want to add.
- Enter the Wi-Fi password (if required). Press the Symbol key to enter numbers or characters not present on the Kindle keyboard. You can continue to use the keyboard while the Symbol menu is displayed.
- Choose “submit.” Kindle connects to the new Wi-Fi network.
If your Kindle fails to connect to the new Wi-Fi network, it will display an “unable to connect” message. You can try manually entering all the network information for the Wi-Fi network by choosing “set up network” when you see the “unable to connect” message. If you don’t know the network information, try connecting to a different network, or contact the network’s administrator.
Forget a Wi-Fi Network
You can tell Kindle to forget the Wi-Fi network you’re connected to so that your Kindle doesn’t connect to it automatically in the future.
To forget the Wi-Fi network that you’re connected to, follow these steps:
- While connected to the network that you want to forget, press the Home button, then press the Menu button.
- Navigate to “Settings” by moving the 5-way controller down, then press the 5-way controller to select.
- Select “view” next to “Wi-Fi Settings” to display a list of detected Wi-Fi networks. You may have to wait a moment as your Kindle detects networks in range. The Wi-Fi network you are currently connected to displays the word “forget” next to it in the list of available networks.
- Choose “forget” to disconnect from the network.
The Home Screen
The Home screen displays a list of all of your Kindle reading materials—books, newspapers, magazines, blogs, PDF files, personal documents, and audiobooks. It serves as a personal bookshelf for all of your reading material, as well as a starting point to access other Kindle features.
To display the Home screen, press the Home button on your Kindle. By default, the Home screen lists all of the items that you have on your Kindle beginning with the most recently viewed (or acquired) items. Each type of content has a slightly different description and label.
Kindle Books
Books are shown by title and author. Below the book title are a series of dots which give you an approximation of how long the book is. Bold dots within the series indicate how far along you are in the book based on the last page you viewed.
Periodicals
Periodicals include newspapers and magazines that can be purchased as a single issue or as a subscription delivered on a regular basis. Your Home screen lists the most recent issue of each periodical you have on your Kindle. Older issues appear inside a grouping called Periodicals: Back Issues. Selecting the grouping takes you to a screen that displays the back issues of all the periodicals you have on your Kindle. Note that Kindle automatically deletes issues that are more than seven issues old to free up space for new content. An exclamation point next to an issue indicates that it will be deleted within 24 hours.
PDF Files
PDF files also look similar to books, but they will be labeled in the Home screen as “pdf.” Like regular books, they have a progress indicator that shows where you are in the file.
Home Screen Features
What you see on your Home screen varies depending on what reading materials you have purchased, and how you choose to sort this list. This list below explains the features that you may find on your Home screen.
Sort options — choose the order you want content displayed in Home.
- Most Recent First — sorts your content by the most recently added or recently opened items first.
- Title — sorts your content alphabetically by title of the item.
- Author — sorts your content alphabetically by the author’s last name or publisher’s name. If you choose this option, periodicals will be sorted by their issue dates.
- Collections — sorts your content by first displaying collections that have been most recently used, then by items that have been most recently used but are not assigned to a collection. Items that are assigned to a collection are not displayed.
New title — the “new” label indicates the item has never been opened and is less than 24 hours old. Once you open a new document or more than 24 hours has passed since the item arrived on your Kindle, the “new” label is removed.
Title — the title of the item.
Progress indicator — the series of dots below the item shows how long the book is and bold dots show how far you have read in a particular item.
PDF title — the “pdf ” label indicates the file is a PDF.
Collection — the title of the collection. The number of items in the collection is displayed in parentheses.
Sample title — the “sample” label indicates that the book or audiobook is a sample. If you like it, you can purchase it from within the sample.
Audiobook title — the “audible” label indicates that the item is an audiobook.
Author or Date — for books, the author of the item is listed. For periodicals and blogs, the date is listed.
Periodicals: Back Issues — stores older issues of newspapers and magazines.
Archived Items — items stored at Amazon that you can re-download to your device.
Pages — indicates the total number of pages in Home. Use the Next Page or Previous Page button to navigate the pages.
Content Formatting on Kindle
When you read a book on Kindle, you will find that the formatting generally follows the printed version of the book. If the book has a table of contents, it will appear in Kindle. If the book has chapters, a preface, an illustrated cover, and so forth, these will be displayed.
When you first open a book, a header appears at the top of the page showing the content title and/or issue date. The header also shows the connection type, signal strength, and battery status indicators. In books, the bottom of the screen shows you the overall percentage of the book you have read.
Once you open a book, when you go to the next or previous page, the header automatically disappears to allow the page to fill the screen. To temporarily display the header (for example, if you want to check battery status), press Menu. Pressing Menu again hides the header.
Progress Indicator
Pressing Menu also temporarily displays a progress bar. Its start location indicates the starting point for your current reading session. As you progress further into the content, a solid bar growing longer indicates your overall reading progress. The progress bar shows structural marks within content such as articles, bookmarks, notes, or highlights. The progress bar also indicates how far you’ve read during your current reading session.
In books, the progress indicator will show a numeric location of where you are reading and, when available, the page number corresponding to a printed version of the book, so you can easily find a particular passage or reference it to your friends.
Using the Menu to Get Around
To go to the menu, press the Menu button when reading a book or periodical. You will have slightly different options depending on the content you are reading. Examples of the menu options are described below.
If you are reading a Kindle book, the menu shows the following options:
Turn Wireless Off — turns off Whispernet. When Whispernet is off, this option will change to “Turn Wireless On.”
Shop in Kindle Store — takes you to the Kindle Storefront.
Buy This Book Now — connects to the Kindle Store, purchases, and downloads the full book to your Kindle. Only appears if you are reading a sample from the Kindle Store.
Go to... — allows you to move to another location in the item you are reading. Choose one of these options:
Book Description — connects to the Kindle Store and displays the book’s detail page.
Search This Book — displays the Search line at the bottom of the screen. Additional details on how to conduct a search are provided in Chapter 4.
Add a Bookmark — bookmarks the page you are currently on. After selecting this option, the upper right corner of the book will be dog-eared and this menu option will change to “Delete Bookmark.”
Add a Note or Highlight — displays a cursor so you can highlight a passage or create a note. See “Using Highlights” and “Using Notes” for additional details on how to create a note or highlight.
View Notes & Marks — displays a page containing all of your current item’s notes, highlights, and bookmarks as well as the Public Notes of people you follow.<BR>
View Popular Highlights — displays a page containing all of your current item’s Popular Highlights. This option is dimmed if the book doesn’t have any popular highlights or if you’ve turned off Popular Highlights in Kindle Settings.
Shop in Kindle Store — takes you to the Kindle Storefront.
Buy This Book Now — connects to the Kindle Store, purchases, and downloads the full book to your Kindle. Only appears if you are reading a sample from the Kindle Store.
Go to... — allows you to move to another location in the item you are reading. Choose one of these options:
- Table of Contents — takes you to the table of contents (if available) for the item you are reading. This option is dimmed if a table of contents is not available.
- Cover — takes you to the cover page of the item you are reading. This is usually the cover of the book.
- Beginning — takes you to the beginning of the book. This is usually the first chapter, but may be a foreword, the table of contents, or some other location.
- End — takes you to the end of the book. From here, you can rate the book, see other recommended books, and share your reading progress with your social networks.
- Page — enter a page number to jump to in the content, and then select this option. Press the Symbol key to enter numbers.
- Location — enter a location number to jump to in the content, and then select this option. Press the Symbol key to enter numbers.
Book Description — connects to the Kindle Store and displays the book’s detail page.
Search This Book — displays the Search line at the bottom of the screen. Additional details on how to conduct a search are provided in Chapter 4.
Add a Bookmark — bookmarks the page you are currently on. After selecting this option, the upper right corner of the book will be dog-eared and this menu option will change to “Delete Bookmark.”
Add a Note or Highlight — displays a cursor so you can highlight a passage or create a note. See “Using Highlights” and “Using Notes” for additional details on how to create a note or highlight.
View Notes & Marks — displays a page containing all of your current item’s notes, highlights, and bookmarks as well as the Public Notes of people you follow.<BR>
View Popular Highlights — displays a page containing all of your current item’s Popular Highlights. This option is dimmed if the book doesn’t have any popular highlights or if you’ve turned off Popular Highlights in Kindle Settings.
If you are reading a newspaper or magazine, you will see the following different options:
Clip This Article — makes a copy of the entire article and adds it to your “My Clippings” file.
Keep This Issue — designates the newspaper or magazine issue as one to be stored in your Kindle until you remove it. Once selected, this option changes to Do Not Keep This Issue.
Keep This Issue — designates the newspaper or magazine issue as one to be stored in your Kindle until you remove it. Once selected, this option changes to Do Not Keep This Issue.
Selecting Internal Links
Your reading material may also contain links to other places in the document. For example, in many books, the table of contents is set up to link to the content pages. Links are easy to spot because they are underlined.
To select a link:
- Use the 5-way to underline the link.
- The cursor changes to look like a pointing hand.
- Press the 5-way to select the link.
- Kindle takes you to the linked location.
- Press the Back button to go back to where you were.
Your reading material may also contain external links that take you to locations on the web.
Accessing the Web
Your Kindle comes with an Experimental application called Web Browser, which is a standard web browser that’s similar to other web browsers you may have used on a computer or another device. It supports JavaScript, SSL, and cookies, but does not support media plug-ins (Flash, Shockwave, etc.) or Java applets.<BR><BR>
To use the web browser, make sure your Kindle is connected to Whispernet.
To use the web browser, make sure your Kindle is connected to Whispernet.
Using Web Browser
There are four ways to open Web Browser. The two main ways are to select “launch browser” from the Experimental screen or to follow a link from within your reading material. Many of the blogs that you subscribe to from the Kindle Store have links to websites. Selecting these links will open Web Browser and take you to the URL (web address) associated with the link. If you select “launch browser” from the Experimental page, you will open to the last website you were viewing in your browser.
One other way of accessing Web Browser is to type in a word anytime from Home or any book, blog, newspaper, personal document, or magazine you happen to be reading. When you begin typing, a search box will pop up at the bottom of the screen, and you can use the 5-way controller to navigate to the right and select “Google” or “Wikipedia” from the menu to search those sites directly for the word you typed.
You can also enter a URL in the Search box from the Home page. Type the URL and use the 5-way to select “go to” and then press the 5-way.
Entering a URL
To enter the URL for a website, navigate to the top of the Browser screen to select the URL text field or press Menu and select “Enter URL.” Begin typing a URL. When you are done typing, use the 5-way controller to select “go to” and press the 5-way controller to go to that website.
The URL text field retains the last URL you entered in case you want to quickly edit the same address and submit it again. If you want to enter a secure site with an “https” address, use the Delete key to delete the automatically entered “http://” and type the address you want.
To the right of the URL text field there is a button to stop loading or reload the current page. From there, use the 5-way to navigate to the right to select “Google”, so you can quickly search with Google for the text entered in the URL text field. Or, navigate to the right again to search Wikipedia. To the left of the URL text field are shortcuts to navigate back and forward one page.
Using Bookmarks and Adding Your Own
Bookmarks let you easily access a web page without needing to type the address every time. When you open Web Browser from the Experimental page for the first time, you will see a list of default bookmarks with links to news, sports, and other information. While browsing, you can also access the same list of bookmarks by selecting “Bookmarks” from the browser menu (just press the Menu button).
To add a website to the Bookmarks page, simply navigate to the site that you want to bookmark and press the Menu button. Move the cursor to “Bookmark This Page” and press the 5-way controller. Any new bookmarks will be added to the existing list on your Kindle.
You can remove a bookmark by going to your Bookmarks list and using the 5-way controller to navigate to the item that you want to delete. Navigate the 5-way left to display “delete bookmark.” Press the 5-way and the site will be deleted from your Bookmarks. From the Bookmarks list, navigating the 5-way to the right lets you edit the name of the bookmark.
Using Next Page and Previous Page
Most web pages you find on the Internet will have more content than can be displayed on one page. Use the Next Page and Previous Page buttons to scroll up or down to see more of the current web page. This is equivalent to using your mouse on a computer to move up and down in a web page. You can also move around the page using the directional buttons on the 5-way controller.
Selecting Links, Buttons, and Boxes
You can navigate the links on a web page by using the 5-way controller to move the cursor around the page. Links in Web Browser are shown as underlined words, just like the links you see when you’re reading a book. Below is a web page with multiple selectable links.
Using the 5-way, position the cursor over a link, so that it changes to a hand icon, then press the 5-way to select that link. The browser will open that page.
If you want to enter information in an input field in a web page, for example, to search that site, you should move the cursor to that input field and begin typing. When you finish typing, press the Return key or select the nearby Go or Enter or Search button to retrieve the results. If there are radio buttons embedded within a web page, you can choose one by moving the cursor to the button you want to change and pressing the 5-way to “select” this button.
Zooming into Web Pages
You can zoom in to any web page to magnify the page. Additionally, if you see a magnifying glass displayed on a web page, you can use it to magnify a specific area of a web page.
To zoom in to any web page, follow these steps:
- While viewing a web page, press Menu.
- Choose Zoom In or Zoom Out.
To zoom in using the magnifying glass, follow these steps:
- Use the 5-way controller to position the magnifying glass over the area that you want to magnify. (The magnifying glass is only available in portrait screen rotation.)
- Press the 5-way to zoom in to the web page.
To see more zoom options, press the Text key.
- fit-to-width — displays the web page by matching the width of the page to the width of your Kindle’s screen; this is the default (normal) size. Pressing the Back button while zoomed in returns the view to normal size.
- 150% — displays the web page at one and one half times the normal size.
- 200% — displays the web page at twice the normal size.
- 300% — displays the web page at three times the normal size.
- actual size — displays the web page at 100% zoom as it would appear if printed.
Once you are zoomed in, you can use the Next Page and Previous Page buttons to move up or down within the web page. You can also use the 5-way to move left, right, up, and down within the web page. The black bars at the right and bottom of the display indicate which portion of the overall page you are viewing. Press the Back button to return the view to the normal size.
Tip: To view web pages in landscape orientation, press the Text key and change the screen rotation.
Optimizing Web Browser for Reading Articles
While viewing articles on a web page, you can switch to Article Mode to make the text on the page easier to read. Article Mode makes reading articles more enjoyable by allowing you to focus on the main text on the page.
To switch to Article Mode, follow these steps:
- While viewing articles on a web page, press Menu.
- Choose “Article Mode.” The view switches to display the main article (including the article’s text and images) on the page.
- Use the Next Page and Previous Page buttons to scroll up or down on the page.
- To return to the standard Web Browser view, press Menu and choose “Web Mode.”
Using History
You can easily return to websites you recently viewed by pressing the Menu button and selecting “History.” You will then see a list of recently visited websites to select from. You can add a site to your Bookmarks by using the 5-way to navigate to the right and choosing “Add to Bookmarks.”
The Web Browser Menu
The Web Browser menu contains other items you can select, many of which also appear in the browser’s navigation bar. To view the menu, press the Menu button when Web Browser is on the screen.
Turn Wireless Off — turns the Whispernet connection off. If you turn the wireless off, you will not be able to use the browser.
Shop in Kindle Store — takes you to the Kindle Storefront.
Enter URL — takes you directly to the URL field where you can enter a web address to visit.
Zoom In — magnifies the web page view. Choose this menu item again (up to three times) to magnify the view up to three times the normal size. Once you are zoomed in, you can use the 5-way to pan left, right, up, and down to see different parts of the page. You can also use the Next Page and Previous Page buttons to pan up or down while zoomed in. The black bars on the right side and bot- tom of the page indicates which portion of the overall page you are viewing.
Zoom Out — zooms out the web page view. Choose this menu item again (up to three times) to return the view to normal size. Pressing the Back button while zoomed in returns the view to normal size.
Article Mode — Article Mode makes reading articles more enjoyable by allowing you to focus on the main text on the page. When you’re using Article Mode, this menu item changes to “Web Mode.” Choose “Web Mode” to return to the standard Web Browser page view.
Bookmarks — displays your list of Web bookmarks.
Bookmark This Page — adds the current page to the bottom of your list of bookmarks.
History — displays your History page, which keeps track of the sites you have visited.
Browser Settings — displays your list of settings where you can change the options for Web Browser.
Other Features
As you become more familiar with the Web Browser, the following topics may be of interest to you.
Downloading Files
Some websites may have books or documents you can download and read on your Kindle. When you select these books or documents using Web Browser, you will be asked to confirm if you want to download these to your Kindle Home. The types of files you can download include Kindle content (.AZW, .AZW1, AZW2, AZW3), unprotected Mobipocket books (.MOBI, .PRC), and text files (.TXT). Wait until the file finishes downloading before leaving the browser window. Kindle notifies you when the file finishes downloading.
Web Browser Settings
You can modify the default browser behaviors and perform simple maintenance procedures using Web Browser Settings. To display the Settings screen, press the Menu button while in the browser and then use the 5-way to select “Settings.”
Clear History — removes cached Internet address entries from your Kindle. Move the on-screen highlight to “Clear History” and press the 5-way to clear this list.
Clear Cookies — removes cookies from your Kindle. Move the on-screen highlight to “Clear Cookies” and press the 5-way to remove the cookies.
Disable JavaScript — enables or disables JavaScript to be executed on the pages you visit. Note that if JavaScript is disabled, web pages will load faster.
Disable Images — select whether you want images to appear when you load a web page. Note that if you do not show images, web pages will load faster.
Kindle Shortcuts
Global Shortcuts
While typing, you can use the top row of the keyboard to enter numbers. From left to right, starting with Q, the letters in the top row of the keyboard represent the numbers 1 through 9. The letter P represents the number 0. To enter a number: Press and hold Alt and press a letter in the top row of the keyboard. For example, Alt + Q types the number 1, and Alt + U types the number 7.
When typing, delete all the characters you typed: Alt + Del.
If your Home page is sorted alphabetically by either Title or Author, press a letter key and then press the 5-way to go to the first item starting with that letter.
In Home, to search for a word in all your books and periodicals: Type a word, then press Return.
Reading Shortcuts
To tweet or share a highlight in a book: Alt + Return.
Add or remove a bookmark: Alt + B.
Add annotation: Press 5-way up or down to display a blinking cursor on the page. Move the cursor to a location on the page, then begin typing to create a note or click to start a highlight.
In most books, to go to the beginning of the next or previous chapter, section, or article, press the 5-way controller right or left.
PDF Shortcuts
To nudge the selection frame when a PDF document is zoomed, or when panning a zoomed document: Hold down the Shift key while using the 5-way controller to nudge up, down, left, or right.
Browser Shortcuts
To reload a web page, press the Return key.
To return the zoomed-in view to normal size, press the Back button. If the view is not zoomed in, pressing the Back button displays the previous page in your browsing history.
Audio Shortcuts
Text-to-Speech: Press Shift + Sym to stop or play and Space bar to pause or resume.
Play MP3: Press Alt + Space bar to stop or play. Press Alt + F to skip to the next track.
Maintaining Your Kindle
Do not use your Kindle or its accessories in rain, or near sinks or other wet locations. Take care not to spill any food or liquid in your Kindle. If your device does get wet, unplug all cables, turn off the wireless (go to Menu, and choose Turn Wireless Off) and let the screen revert to the screen saver. Wait for the device to dry completely before sliding the switch to wake again. Do not attempt to dry your Kindle with an external heat source, such as a microwave oven or hair dryer. Clean the screen with a soft cloth; be careful not to wipe it with anything abrasive. When carrying your Kindle in a bag or briefcase, keep a book cover on to avoid scratches.
Don’t expose your Kindle to extreme heat or cold. For example, don’t leave it in the trunk of your car in sub-zero or high-heat conditions.
Many issues can be resolved by restarting your Kindle. Try the following:
- Press the Home button.
- Press the Menu button.
- Select “Settings.”
- Press the Menu button.
- Select “Restart.”
If your Kindle is unresponsive, then try resetting it by doing the following:
- Disconnect your Kindle from any power source.
- Slide and hold the power switch for 15 seconds before releasing.
Note that the screen will be blank for approximately 30 seconds while your Kindle restarts.